Crochet Louvre Pyramid Paperweight Free Pattern
Crochet Louvre Pyramid Paperweight – Free Pattern
Introduction
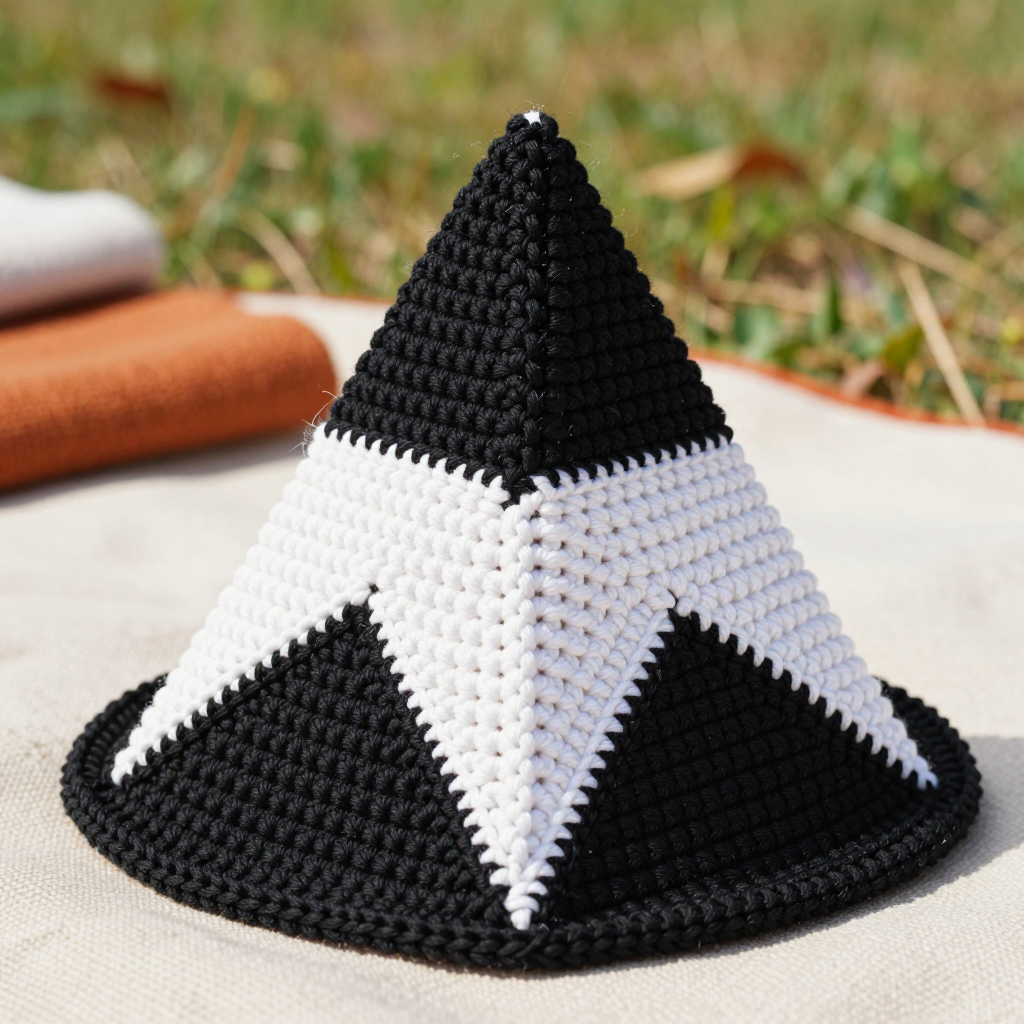
This little crochet pyramid is a love letter to Paris: four single-crochet triangles, two in black and two in white, joined into a crisp four-sided pyramid that echoes the glass landmark in the Louvre courtyard. It is a perfect project for an advanced beginner who is comfortable with single crochet and simple increases, and it works up in an evening or two. At just 3.5 inches (9 cm) square and 3 inches (7.5 cm) tall, it sits neatly on a desk, shelf, or stack of books, holding down papers with a touch of Parisian chic. The cotton yarn gives it a firm, dense, satisfying weight in the hand, so it looks sculptural and feels sturdy enough to actually do its job.
Materials Needed
- Yarn: Worsted weight (4) cotton yarn — approximately 30 yards (27 m) black and 20 yards (18 m) white. Cotton is recommended for its firmness and stitch definition.
- Hook: 5.0 mm (H/8) crochet hook
- Notions: Tapestry needle, scissors, stitch marker (optional, for the base spiral)
- Finished size: 3.5 inches (9 cm) square base, 3 inches (7.5 cm) tall
Abbreviations
- ch — chain: yarn over and pull through the loop on your hook.
- sc — single crochet: insert hook in stitch, yarn over, pull up a loop, yarn over, pull through both loops.
- inc — increase: work 2 single crochet stitches into the same stitch.
- st(s) — stitch(es)
- Rnd — round: a full circle of stitches worked in a spiral.
Gauge
16 single crochet stitches and 16 rows = 4 inches (10 cm). Work a small swatch in single crochet and measure a 4-inch section; if you have more stitches than 16, go up a hook size, and if you have fewer, go down a hook size.
Tips Before You Start
- Keep your single crochet tension even and slightly firm — a dense fabric is what gives this paperweight its structure.
- Each triangle increases by exactly one stitch per row, so count your stitches at the end of every row to stay on track.
- When joining triangles, work your single crochet join evenly along the edge so the four faces meet cleanly at the top point.
- The base is a long, simple spiral; use a stitch marker at the start of each round so you never lose your place.
Step-by-Step Instructions
Triangle (make 4: 2 black, 2 white)
Row 1: With black, ch 2, 2 sc in 2nd ch from hook (2 sts).
Row 2: Ch 1, turn, 2 sc in first st, sc in next st (3 sts).
Row 3: Ch 1, turn, 2 sc in first st, sc in each st across (4 sts).
Rows 4–15: Ch 1, turn, 2 sc in first st, sc in each st across (16 sts after Row 15).
Fasten off. Repeat for the second black triangle. With white, work the same as the black triangles to make two white triangles.
Assembly of the Pyramid
Hold two triangles with right sides together, matching edges. Starting at the base corner, sc evenly along one side edge to join, working through both layers. Fasten off. Repeat for all four triangles to form a pyramid, leaving the base open. Weave in ends.
Base (optional)
With black, ch 2.
Rnd 1: 6 sc in 2nd ch from hook (6 sts).
Rnd 2: Inc in each st around (12 sts).
Rnd 3: [Sc, inc] around (18 sts).
Rnd 4: [2 sc, inc] around (24 sts).
Rnd 5: [3 sc, inc] around (30 sts).
Rnd 6: [4 sc, inc] around (36 sts).
Rnd 7: [5 sc, inc] around (42 sts).
Rnd 8: [6 sc, inc] around (48 sts).
Rnd 9: [7 sc, inc] around (54 sts).
Rnd 10: [8 sc, inc] around (60 sts).
Rnd 11: [9 sc, inc] around (66 sts).
Rnd 12: [10 sc, inc] around (72 sts).
Rnd 13: [11 sc, inc] around (78 sts).
Rnd 14: [12 sc, inc] around (84 sts).
Rnd 15: [13 sc, inc] around (90 sts).
Rnd 16: [14 sc, inc] around (96 sts).
Rnd 17: [15 sc, inc] around (102 sts).
Rnd 18: [16 sc, inc] around (108 sts).
Rnd 19: [17 sc, inc] around (114 sts).
Rnd 20: [18 sc, inc] around (120 sts).
Rnd 21: [19 sc, inc] around (126 sts).
Rnd 22: [20 sc, inc] around (132 sts).
Rnd 23: [21 sc, inc] around (138 sts).
Rnd 24: [22 sc, inc] around (144 sts).
Rnd 25: [23 sc, inc] around (150 sts).
Rnd 26: [24 sc, inc] around (156 sts).
Rnd 27: [25 sc, inc] around (162 sts).
Rnd 28: [26 sc, inc] around (168 sts).
Rnd 29: [27 sc, inc] around (174 sts).
Rnd 30: [28 sc, inc] around (180 sts).
Rnd 31: [29 sc, inc] around (186 sts).
Rnd 32: [30 sc, inc] around (192 sts).
Rnd 33: [31 sc, inc] around (198 sts).
Rnd 34: [32 sc, inc] around (204 sts).
Rnd 35: [33 sc, inc] around (210 sts).
Rnd 36: [34 sc, inc] around (216 sts).
Rnd 37: [35 sc, inc] around (222 sts).
Rnd 38: [36 sc, inc] around (228 sts).
Rnd 39: [37 sc, inc] around (234 sts).
Rnd 40: [38 sc, inc] around (240 sts).
Rnd 41: [39 sc, inc] around (246 sts).
Rnd 42: [40 sc, inc] around (252 sts).
Rnd 43: [41 sc, inc] around (258 sts).
Rnd 44: [42 sc, inc] around (264 sts).
Rnd 45: [43 sc, inc] around (270 sts).
Rnd 46: [44 sc, inc] around (276 sts).
Rnd 47: [45 sc, inc] around (282 sts).
Rnd 48: [46 sc, inc] around (288 sts).
Rnd 49: [47 sc, inc] around (294 sts).
Rnd 50: [48 sc, inc] around (300 sts).
Fasten off, leaving a long tail. Sew the base to the bottom edge of the pyramid. Weave in ends.
Assembly and Finishing
Join the four triangles as described in the Assembly section, working single crochet through both layers along one side edge at a time until the pyramid is closed and only the base is open. Sew the optional circular base to the bottom edge with the long tail, easing it into place so the pyramid sits flat. Weave in all ends on the wrong side. Block lightly by misting with water and shaping the pyramid over a small form or simply pressing the base flat; let it dry completely before use.
Pro Tips and Variations
- Use a contrasting join color, such as a thin white single-crochet seam on the black edges, to make the pyramid structure pop.
- Skip the base for a lighter, open-bottom pyramid, or stuff it lightly with fiberfill before sewing the base on for a softer paperweight.
- Try a metallic or variegated yarn for one triangle to create a glass-like highlight on one face of the pyramid.