Fall Wreath Cable Stocking Free Knit Pattern
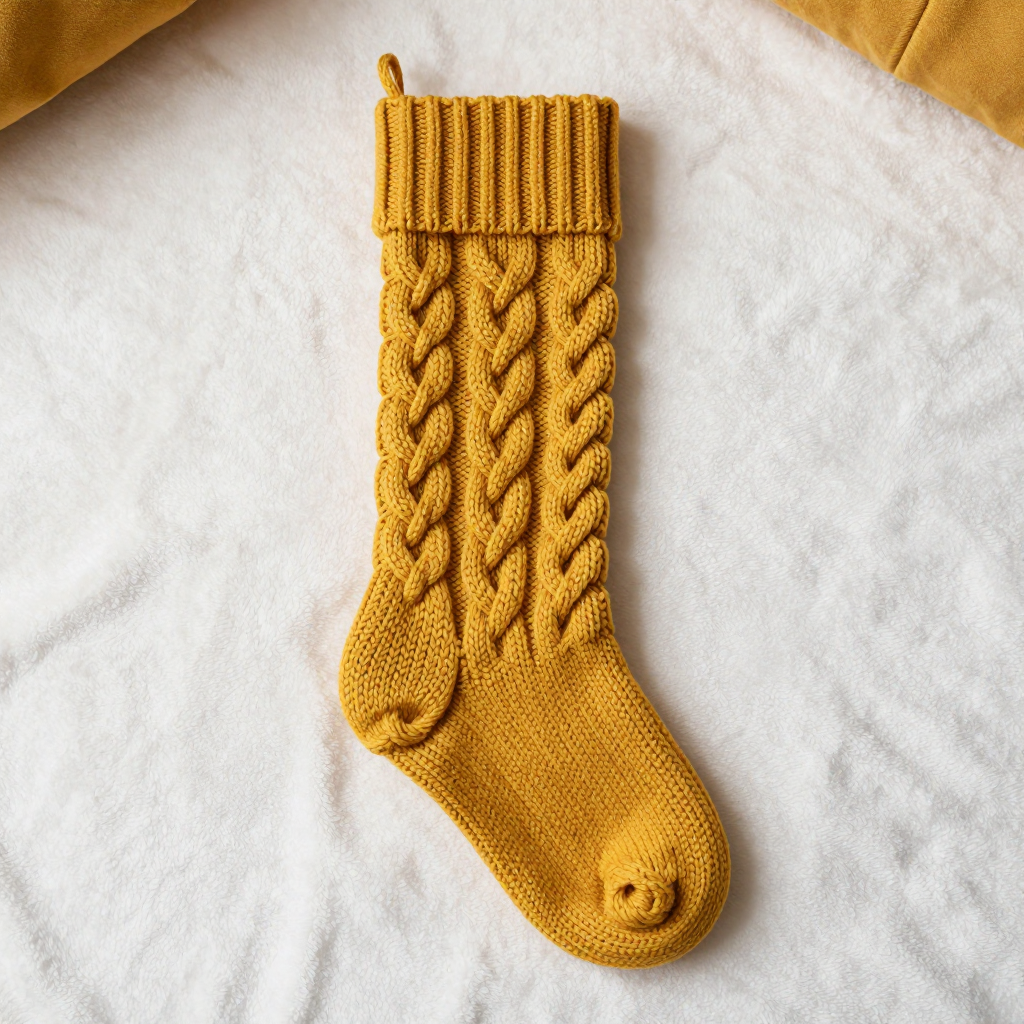
Fall Wreath Cable Stocking Free Knit Pattern
Introduction
This knitted stocking is made for anyone who loves a cozy, Nordic-inspired holiday but wants something a little warmer and more unexpected than the usual red and green. Worked in a soft saffron velvet yarn, it glows like late autumn leaves and spice-market stalls, and the single looped wreath cable around the upper leg gives it a quiet, elegant detail without overwhelming a beginner's confidence. The stocking is knitted flat and seamed, so you never have to juggle double-pointed needles or magic loop, and the plain stockinette foot keeps the finishing simple. The finished piece feels plush and velvety in the hand, with a snug ribbed cuff and a rounded grafted toe that hangs beautifully from a mantel or bedpost.
Materials Needed
- Yarn: Worsted weight velvet yarn (100% polyester), 200 yd (183 m) per 100 g skein; 1 skein in Saffron (approx. 180 yd used).
- Needles: 4.5 mm (US 7) straight needles, or size to obtain gauge.
- Notions: Cable needle, 2 stitch markers, tapestry needle, scissors, tape measure.
- Finished size: Length from cuff to toe 18 in (46 cm); foot circumference 8 in (20 cm); leg circumference 8 in (20 cm); cuff circumference 7 in (18 cm) unstretched.
Abbreviations
- k – knit
- p – purl
- st(s) – stitch(es)
- RS – right side (the outside of the stocking)
- WS – wrong side (the inside of the stocking)
- St st – stockinette stitch: knit on RS rows, purl on WS rows
- k2tog – knit 2 stitches together (a right-leaning decrease)
- ssk – slip, slip, knit the two slipped stitches together (a left-leaning decrease)
- sl1 – slip 1 stitch purlwise with yarn in front
- C4F – cable 4 front: slip 2 sts to cable needle and hold in front, k2, then k2 from cable needle
- C4B – cable 4 back: slip 2 sts to cable needle and hold in back, k2, then k2 from cable needle
- inc – increase (not used in this pattern, listed only if you adjust sizing)
Gauge
18 sts and 24 rows = 4 in (10 cm) in stockinette stitch. Knit a 4 in (10 cm) square swatch in St st, block it lightly, and count your stitches and rows across 4 in (10 cm) to confirm the match before casting on.
Tips Before You Start
- Velvet yarn shows every twist and pull, so keep your tension relaxed and avoid ripping back repeatedly; frog gently and re-knit slowly.
- Count your cable panel stitches after every cable row — the wreath ring is only 12 rows tall, so a quick check keeps the pattern clean.
- Place a locking marker on the RS of your work at the start so you always know which side faces you during the heel and gusset.
- Because velvet has little stretch memory, block only lightly and let the stocking dry flat so the cable ring keeps its shape.
Step-by-Step Instructions
Cuff
Cast on: Cast on 36 sts.
Ribbing: Work in k1, p1 rib for 1.5 in (3.5 cm).
Change: Change to St st.
Leg
Rows 1–12: Work even in St st for 2 in (5 cm) (36 sts).
Wreath Cable Ring (multiple of 12 sts + 6)
R1 (RS): k3, [p2, k8, p2] twice, k3 (36 sts).
R2 and all WS rows: k the k sts and p the p sts (36 sts).
R3: k3, [p2, C4F, C4B, p2] twice, k3 (36 sts).
R4: Work as R2 (36 sts).
R5: k3, [p2, k8, p2] twice, k3 (36 sts).
R6: Work as R2 (36 sts).
R7: k3, [p2, C4B, C4F, p2] twice, k3 (36 sts).
R8: Work as R2 (36 sts).
R9: k3, [p2, k8, p2] twice, k3 (36 sts).
R10: Work as R2 (36 sts).
R11: k3, [p2, C4F, C4B, p2] twice, k3 (36 sts).
R12: Work as R2 (36 sts).
Upper Foot of Leg
Rows 1–12: Work even in St st for 2 in (5 cm) (36 sts).
Heel
Heel flap: Work back and forth on the first 18 sts in St st for 18 rows, ending with a WS row (18 sts).
Shape heel R1 (RS): k10, k2tog, k1, turn (12 sts).
R2: sl1, p3, p2tog, p1, turn (11 sts).
R3: sl1, k4, k2tog, k1, turn (10 sts).
R4: sl1, p5, p2tog, p1, turn (9 sts).
R5: sl1, k6, k2tog, k1, turn (8 sts).
R6: sl1, p7, p2tog, p1, turn (7 sts).
R7: sl1, k8, k2tog, k1, turn (6 sts).
R8: sl1, p9, p2tog, p1, turn (5 sts).
R9: sl1, k10, k2tog, k1, turn (4 sts).
R10: sl1, p11, p2tog, p1, turn (3 sts).
R11: sl1, k12, k2tog, k1, turn (2 sts).
R12: sl1, p13, p2tog, p1, turn (1 st).
R13: sl1, k14, k2tog, k1, turn (1 st).
R14: sl1, p15, p2tog, p1, turn (1 st).
R15: sl1, k16, k2tog, k1, turn (1 st).
R16: sl1, p17, p2tog, p1, turn (1 st).
Result: 10 heel sts remain.
Gusset
Set-up: With RS facing, pick up and knit 9 sts along right side of heel flap, knit across 18 instep sts, pick up and knit 9 sts along left side of heel flap, knit across 10 heel sts (46 sts total).
R1 (WS): p22, place marker, p2, place marker, p22 (46 sts).
R2 (RS): k to 2 sts before first marker, k2tog, slip marker, k2, slip marker, ssk, k to end (44 sts).
R3: p all sts (44 sts).
Repeat: Repeat R2–R3 until 36 sts remain.
Foot
Rows 1–30: Work even in St st for 5 in (12.5 cm) from gusset, or until foot measures 2 in (5 cm) less than desired finished length (36 sts).
Toe
R1 (RS): k1, ssk, k to 3 sts before marker, k2tog, k1, slip marker, k1, ssk, k to 3 sts before end, k2tog, k1 (32 sts).
R2: p all sts (32 sts).
Repeat: Repeat R1–R2 until 16 sts remain.
Finish: Graft toe with Kitchener stitch.
Assembly and Finishing
Seam the leg and foot edges together using mattress stitch, matching the cable ring rows so the wreath pattern lines up neatly. Weave in all ends on the WS, then block lightly to the measurements given above and let dry flat. If you like, hang the stocking with a loop of yarn at the cuff.
Pro Tips and Variations
- Swap the saffron velvet for a deep rust or mustard wool blend for a crisper cable definition and a more rustic autumn look.
- Add a second wreath cable ring lower on the leg for a taller, more dramatic stocking — just keep the 2 in (5 cm) spacing between rings.
- Work the cuff in a twisted rib (k1tbl, p1) for a tighter, more polished edge that holds its shape on the mantel.


