Ocean Blue Whale Cuddle Buddy Free Crochet Pattern
Introduction
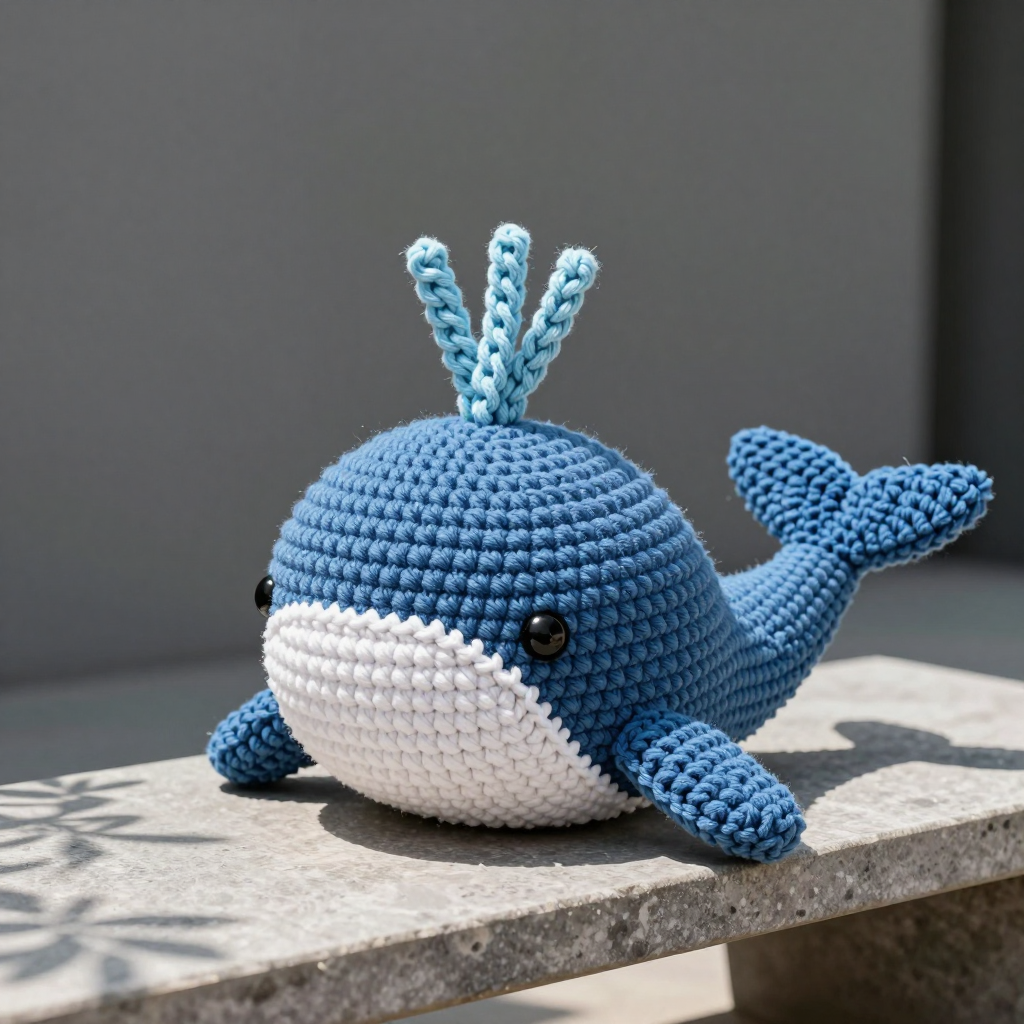
Meet your new favorite cuddle buddy: a round, squishy ocean blue whale that fits right in the palm of your hands and in your heart. This pattern is written for crocheters who have made a few amigurumi pieces before and are ready to practice shaping, simple flat pieces, and tidy assembly. The whale is worked as one closed sphere, so the body comes together quickly, while the white belly patch, two side fins, and a two-lobed tail fin give it that unmistakable whale silhouette. A little spout of light blue chain loops stands up from the top of the head, and two tiny French knot eyes finish the face. Worked in worsted weight acrylic, it comes out soft, light, and wonderfully huggable at about 8 inches (20 cm) long.
Materials Needed
- Yarn: Worsted weight (4) acrylic yarn: 150 yds ocean blue (A), 50 yds white (B), 20 yds light blue (C)
- Hook: 4.0 mm (G/6)
- Notions: Stitch marker, tapestry needle, scissors, polyester fiberfill for stuffing
- Finished size: Approximately 8 inches (20 cm) long from nose to tail and 6 inches (15 cm) tall
Abbreviations
- MR – magic ring: a loop of yarn you crochet into to start a closed circle
- sc – single crochet
- inc – increase: work 2 sc into the same stitch
- dec – decrease: work 2 stitches together into 1 sc
- sc2tog – single crochet 2 together: another name for a decrease
- ch – chain
- sl st – slip stitch
- st(s) – stitch(es)
- R / Rnd – round (worked in a continuous spiral)
- FO – fasten off
Gauge
15 sc and 16 rows = 4 inches (10 cm). Crochet a small swatch in sc and measure a 4-inch section; if you have more stitches than 15, go up a hook size, and if you have fewer, go down one.
Tips Before You Start
- Use a stitch marker in the first stitch of each round. The body is worked in a continuous spiral, so the rounds blend together and the marker keeps you on track.
- Stuff the body firmly but gradually, starting around Round 18, so the sphere holds its round shape without stretching the stitches.
- Pin the belly, fins, and tail in place before sewing. Check the whale from the front and both sides so everything sits symmetrically.
- Keep your tension even on the flat pieces (belly, fins, tail). Slightly tighter tension helps them hold a crisp triangular shape.
Step-by-Step Instructions
Body (Yarn A)
Rnd 1: MR, 6 sc (6 sts)
Rnd 2: inc x6 (12 sts)
Rnd 3: [sc, inc] x6 (18 sts)
Rnd 4: [2 sc, inc] x6 (24 sts)
Rnd 5: [3 sc, inc] x6 (30 sts)
Rnd 6: [4 sc, inc] x6 (36 sts)
Rnd 7: [5 sc, inc] x6 (42 sts)
Rnds 8–16: sc in each st around (42 sts)
Rnd 17: [5 sc, dec] x6 (36 sts)
Rnd 18: [4 sc, dec] x6 (30 sts)
Rnd 19: [3 sc, dec] x6 (24 sts)
Rnd 20: [2 sc, dec] x6 (18 sts)
Stuff firmly.
Rnd 21: [sc, dec] x6 (12 sts)
Rnd 22: dec x6 (6 sts)
FO, leaving a long tail. Weave the tail through the last 6 sts and pull closed.
Belly (Yarn B)
Work in rows on the front of the body, joining at Round 16.
Row 1: Join B to front of body at R16, ch 1, sc in same st, sc in next 10 sts (11 sts)
Row 2: ch 1, turn, sc in each st across (11 sts)
Row 3: ch 1, turn, sc2tog, sc in next 7 sts, sc2tog (9 sts)
Row 4: ch 1, turn, sc in each st across (9 sts)
Row 5: ch 1, turn, sc2tog, sc in next 5 sts, sc2tog (7 sts)
FO. Sew the edges to the body.
Tail Fin (Yarn A) – make 2
Row 1: Ch 11, sc in 2nd ch from hook and each ch across (10 sts)
Row 2: ch 1, turn, sc2tog, sc in next 6 sts, sc2tog (8 sts)
Row 3: ch 1, turn, sc2tog, sc in next 4 sts, sc2tog (6 sts)
Row 4: ch 1, turn, sc2tog, sc in next 2 sts, sc2tog (4 sts)
Row 5: ch 1, turn, sc2tog twice (2 sts)
FO. Sew one to each side of the back at R20, aligning the straight edges together.
Side Fins (Yarn A) – make 2
Row 1: Ch 7, sc in 2nd ch from hook and each ch across (6 sts)
Row 2: ch 1, turn, sc2tog, sc in next 2 sts, sc2tog (4 sts)
Row 3: ch 1, turn, sc2tog twice (2 sts)
FO. Sew one to each side of the body at R12, angled slightly back.
Spout (Yarn C)
Join C to the top center of the body.
Loop 1: Ch 10, sl st back along the ch (10 sts)
Loop 2: Ch 8, sl st back along the ch (8 sts)
Loop 3: Ch 6, sl st back along the ch (6 sts)
FO. Weave in ends.
Eyes (Yarn A)
With A, embroider one French knot on each side of the head at R14, 5 sts apart.
Assembly and Finishing
Weave in all ends. Sew the belly patch, side fins, and tail fins securely with small, even stitches, checking placement as you go. Embroider the eyes last so you can adjust them for a friendly expression. Lightly steam or mist block the whale and let it dry fully, reshaping the sphere and flattening the fins and tail as it dries.
Pro Tips and Variations
- Swap the ocean blue for a soft gray or lavender to make a different sea friend, or use a variegated blue for a watercolor look.
- Add a small rattle or squeaker inside the stuffing before closing the body for a baby-friendly toy.
- Make the spout in a contrasting color, or add a fourth longer chain loop for a taller, splashier spout.