Thanksgiving Chevron Slipover: Free Knit Pattern
Introduction
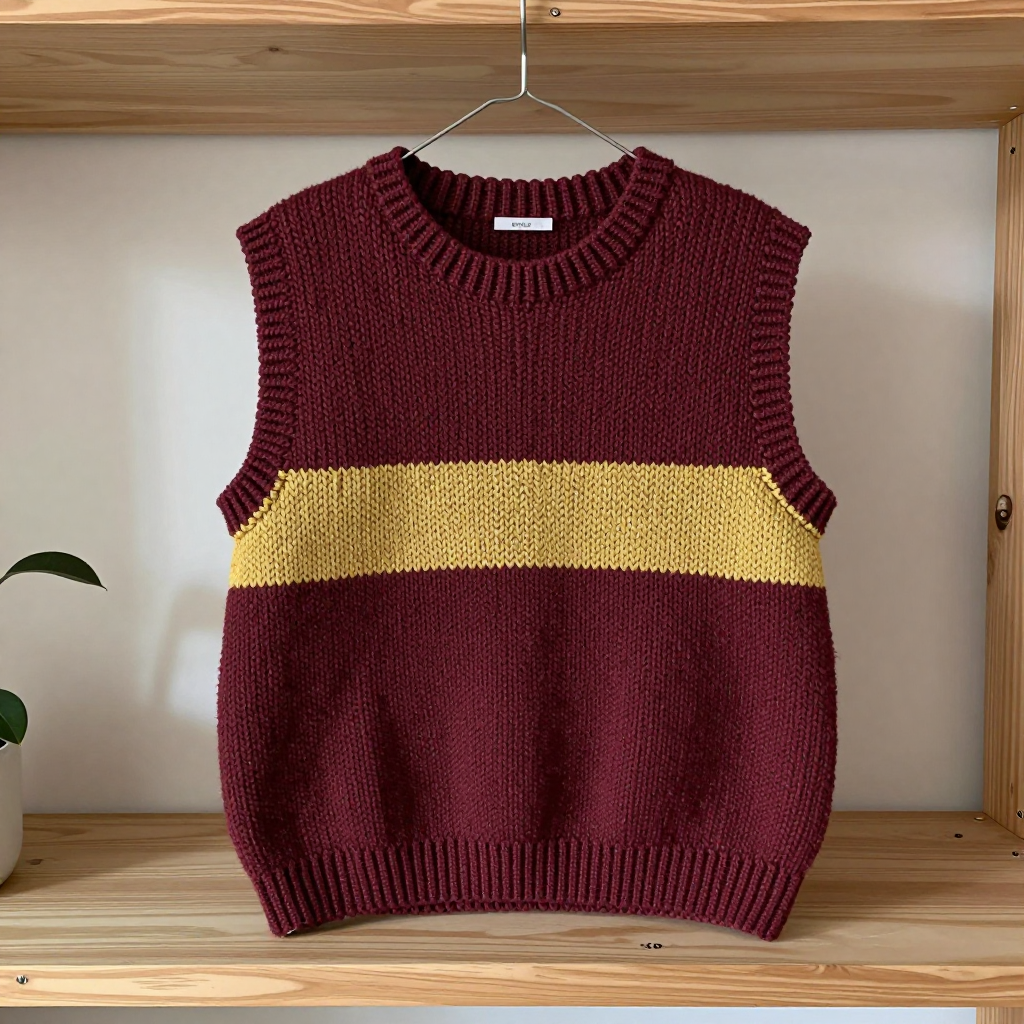
The Thanksgiving Chevron Slipover is a cozy, sleeveless layer made for crisp autumn afternoons and long dinners around the table. It is written for teen sizes S (M, L) and is a great next step for a confident beginner who has knitted in the round and is ready to try simple shaping. The body is worked in herringbone stitch, which gives the fabric a dense, textured chevron surface that looks far more complicated than it is. A wide gold stripe across the chest adds a warm pop of color, while burgundy ribbing at the neck and armholes gives it a polished, finished feel.
Materials Needed
- Yarn: DK weight, 100% merino, 200 yards per 100 g skein.
- Color A (burgundy): 3 skeins (600 yds)
- Color B (gold): 1 skein (200 yds)
- Needles: US 6 (4.0 mm) circular needle, 24" length (main fabric); US 4 (3.5 mm) circular needles in 16" and 24" lengths (ribbing and bands).
- Notions: Stitch markers, stitch holders or scrap yarn, a tapestry needle, and a tape measure.
- Finished size: To fit teen sizes S (M, L). Chest circumference 32 (34, 36) inches. Length from shoulder 22 (23, 24) inches.
Abbreviations
- CO: cast on
- BO: bind off
- st(s): stitch(es)
- rnd(s): round(s)
- RS / WS: right side / wrong side
- K: knit
- P: purl
- K2tog: knit two stitches together
- dec: decrease
- pm: place marker
- beg: beginning
- rep: repeat
Gauge
22 sts and 32 rows = 4 inches in herringbone stitch with the larger needle. Knit a swatch in the herringbone pattern, block it lightly, and measure a 4-inch section; adjust your needle size if needed to match.
Tips Before You Start
- Herringbone is dense. The K2tog-and-reknit maneuver pulls the fabric tight, so your stitch count stays the same but the fabric grows more slowly than plain stockinette. Trust the measurements, not just the row count.
- Keep the first stitch snug. When you work the herringbone maneuver, pull the first stitch firmly so the chevron texture stays even and the fabric does not loosen.
- Change colors on a purl round. The stripe is a plain color change in the same stitch pattern, so switch to Color B at the start of a purl round for the cleanest transition.
- Try on as you go. Because the body is a straight tube with no waist shaping, check the length against your own measurements before you divide for the armholes.
Step-by-Step Instructions
Herringbone Pattern (multiple of 2 sts)
Rnd 1: *K2tog but leave sts on left needle, knit first st again, slip both sts off*, rep from * to *.
Rnd 2: Purl.
Repeat Rnds 1-2 for pattern.
Body
With the smaller 24" needle and Color A, CO 176 (188, 200) sts. Join to work in the round, being careful not to twist, and pm for beg of rnd.
Rnds 1-8: *K2, P2* ribbing (176 (188, 200) sts).
Change to the larger needle.
Work in herringbone pattern until the piece measures 12 (12.5, 13) inches from the cast-on edge, ending after a purl rnd.
Chest Stripe
Change to Color B. Work in herringbone pattern for 2 inches (about 16 rnds).
Change back to Color A. Work in herringbone pattern for 1 inch (about 8 rnds).
Divide for Armholes
Next rnd: BO 8 (10, 12) sts, work in pattern to last 8 (10, 12) sts, BO 8 (10, 12) sts. Place the remaining sts on hold for the back and front separately (80 (84, 88) sts each).
Back
Work the back sts (80 (84, 88) sts) flat in herringbone pattern.
Shape armholes: BO 2 sts at beg of next 2 rows, then dec 1 st each side every RS row 3 (4, 5) times (70 (72, 74) sts).
Work even until the armhole measures 6 (6.5, 7) inches, ending with a WS row.
Shape shoulders and neck:
Next row (RS): Work 20 (21, 22) sts, BO 30 (30, 30) sts for neck, work to end.
Next row: Work 20 (21, 22) sts, turn. BO 5 sts at beg of next 2 RS rows, then BO remaining 10 (11, 12) sts.
Rejoin yarn to the other side and work to correspond.
Front
Work the front sts (80 (84, 88) sts) flat in herringbone pattern.
Shape armholes: Work same as back (70 (72, 74) sts).
Work even until the armhole measures 3 (3.5, 4) inches, ending with a WS row.
Shape neck:
Next row (RS): Work 25 (26, 27) sts, BO 20 (20, 20) sts for neck, work to end.
Next row: Work to end. Dec 1 st at neck edge every RS row 5 (5, 5) times (20 (21, 22) sts).
Work even until the armhole measures 6 (6.5, 7) inches, ending with a WS row.
Shape shoulder: BO 5 sts at beg of next 2 RS rows, then BO remaining 10 (11, 12) sts.
Rejoin yarn to the other side and work to correspond.
Neckband
With the smaller 16" needle and Color A, pick up and knit 100 (100, 100) sts evenly around the neck edge. Join to work in the round.
Rnds 1-8: *K2, P2* ribbing (100 sts).
BO in rib.
Armhole Bands (make 2)
With the smaller 16" needle and Color A, pick up and knit 80 (84, 88) sts evenly around one armhole. Join to work in the round.
Rnds 1-8: *K2, P2* ribbing (80 (84, 88) sts).
BO in rib. Repeat for the other armhole.
Assembly and Finishing
Sew the shoulder seams together using a simple mattress stitch, matching the bound-off edges. Weave in all ends on the wrong side, working them through the dense herringbone fabric so they stay secure. Block the vest to the finished measurements: soak it gently in cool water, roll it in a towel to remove excess water, then lay it flat and pin it to the chest and length measurements. Let it dry completely before wearing.
Pro Tips and Variations
- Change the stripe: Swap the gold for a rust or cream tone, or widen the stripe to 3 inches for a bolder chevron band across the chest.
- Add length: Work the body an extra 1-2 inches before the armhole division for a longer, tunic-style slipover.
- Try a contrast rib: Work the neckband and armhole bands in Color B for a subtle gold trim that ties the whole piece together.