Chunky Rustic Earflap Hat Free Crochet Pattern
Introduction
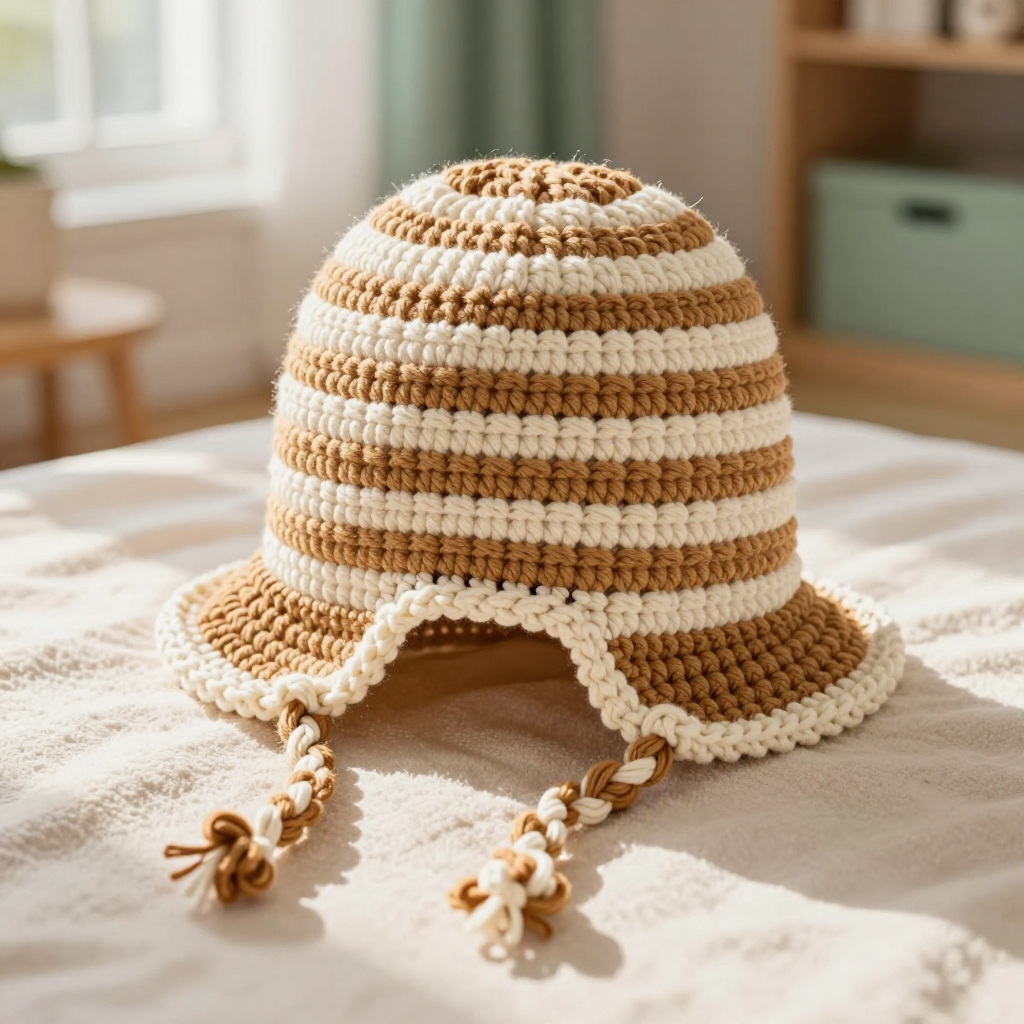
This Chunky Rustic Earflap Hat is the perfect cozy project for anyone who wants a warm, farmhouse-style winter accessory without a complicated pattern. Worked as a simple straight tube in joined single crochet rounds, it uses super bulky yarn so it stitches up quickly in an afternoon. The camel and cream stripes give it a soft, rustic look, while the two little earflaps and braided ties add charm and extra warmth. Whether you are new to crochet or a seasoned maker looking for a fast, satisfying gift, this hat is a joy to make and even better to wear.
Materials Needed
- Yarn: Super bulky (6) weight yarn, wool or wool blend. Approximately 80 yards of camel (A) and 40 yards of cream (B).
- Hook: 8 mm (L/11) crochet hook.
- Notions: Tapestry needle for seaming and weaving in ends, scissors, and a measuring tape.
- Finished size: Circumference 22 inches, height 9 inches (including brim), earflaps 3 inches long.
Abbreviations
- ch – chain
- sc – single crochet
- sc2tog – single crochet two stitches together (a decrease)
- sl st – slip stitch
- st(s) – stitch(es)
- R – round or row
Gauge
8 stitches and 8 rows = 4 inches in single crochet. To check, crochet a small swatch in single crochet and measure a 4-inch section; adjust your hook size if needed to match.
Tips Before You Start
- When joining the starting chain into a ring, double-check that it is not twisted before you slip stitch, or your hat will have a spiral seam.
- Keep your single crochet tension even so the stripes stay flat and the hat holds its shape.
- Change colors at the end of a round by pulling the new color through the final slip stitch, then continue as written.
- Try the hat on (or measure) before adding the earflaps so you can position them comfortably over the ears.
Step-by-Step Instructions
Hat Body (worked in joined rounds)
With A, ch 44, join with sl st to first ch to form a ring, being careful not to twist.
R1: ch 1, sc in each ch around, join with sl st to first sc (44 sts).
R2–4: ch 1, sc in each st around, join with sl st to first sc (44 sts).
Change to B.
R5–8: ch 1, sc in each st around, join with sl st to first sc (44 sts).
Change to A.
R9–12: ch 1, sc in each st around, join with sl st to first sc (44 sts).
Change to B.
R13–16: ch 1, sc in each st around, join with sl st to first sc (44 sts).
Change to A.
R17–18: ch 1, sc in each st around, join with sl st to first sc (44 sts).
Fasten off, leaving a long tail for seaming. Turn the hat inside out and whipstitch the top edge closed to form a flat seam. Turn right side out.
Earflaps (make 2)
With A, join yarn to the bottom edge of the hat at the seam, leaving a gap of 5 inches from the seam on each side for the front and back.
Row 1: ch 1, sc in next 8 sts along the bottom edge, turn (8 sts).
Row 2: ch 1, sc in each st across, turn (8 sts).
Row 3: ch 1, sc2tog, sc in next 4 sts, sc2tog, turn (6 sts).
Row 4: ch 1, sc in each st across, turn (6 sts).
Row 5: ch 1, sc2tog, sc in next 2 sts, sc2tog, turn (4 sts).
Row 6: ch 1, sc in each st across, turn (4 sts).
Row 7: ch 1, sc2tog twice, turn (2 sts).
Row 8: ch 1, sc2tog (1 st). Fasten off.
Repeat for the second earflap, positioning it symmetrically on the opposite side.
Braided Ties (make 2)
Cut 6 strands of yarn (3 of each color) about 30 inches long. Fold the bundle in half and pull the loop through the tip of one earflap, then pull the ends through the loop to secure. Braid the strands, knot at the end, and trim evenly. Repeat for the other earflap.
Edging
With B, join yarn at the bottom edge of the hat at the seam.
R1: ch 1, sc evenly around the entire bottom edge, including the earflaps, join with sl st to first sc. Fasten off.
Assembly and Finishing
Whipstitch the top edge of the hat closed as described, keeping the seam flat and neat. Weave in all ends on the wrong side, securing the color changes so they do not loosen. Lightly block the hat by misting it with water and shaping it flat, especially the earflaps, then let it dry completely. Trim the braided tie ends evenly once more after blocking.
Pro Tips and Variations
- Swap the stripe colors for any two shades you love, or use a single color for a minimalist look.
- Add a small crochet flower or a faux fur pom-pom to the top seam for extra personality.
- For a slouchier fit, add a few extra rounds before closing the top, keeping the same stitch count.