Pastel Plaid Snuffle Mat Free Crochet Pattern
Pastel Plaid Snuffle Mat Free Crochet Pattern
Introduction
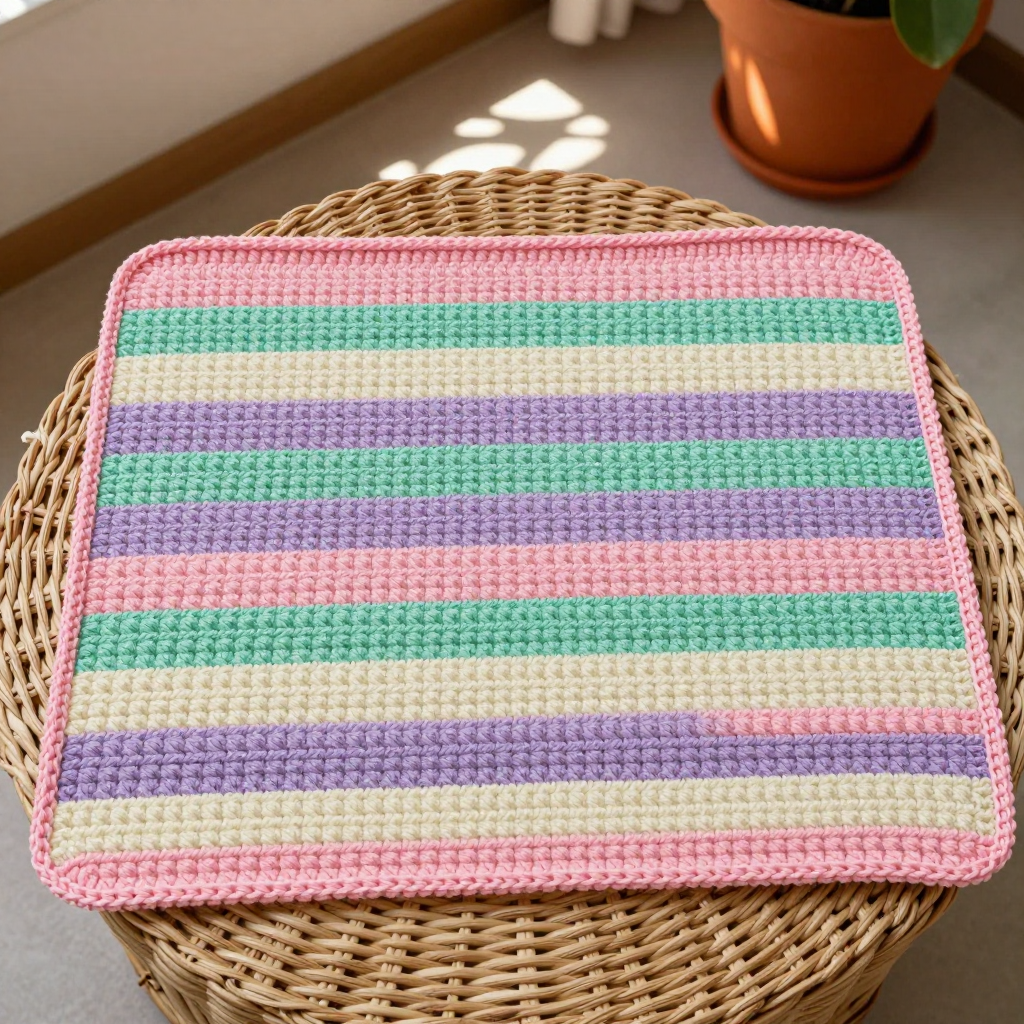
This snuffle mat is a simple, satisfying project for anyone who wants to make something useful for a big, busy dog. It is worked as one flat rectangle in dense linen stitch, so the fabric is bumpy and textured enough to hide kibble and treats while your dog snuffles and noses them out. The pastel plaid stripes of pale pink, mint, lavender, and cream make it pretty enough to leave out in the living room, and the sturdy cotton yarn holds up to enthusiastic digging and pawing. If you can single crochet and chain, you can make this mat.
Materials Needed
- Yarn: Worsted weight (category 4) cotton, approx 300 yd total:
- Color A (pale pink): 100 yd
- Color B (mint): 80 yd
- Color C (lavender): 80 yd
- Color D (cream): 40 yd
- Hook: 5.0 mm (H-8) crochet hook
- Notions: Tapestry needle for weaving in ends, scissors, measuring tape
- Finished size: Approx 20 inches wide x 16 inches long
Abbreviations
- ch – chain
- sc – single crochet
- sk – skip (work past the next stitch or space without working into it)
- sp – space (the little gap made by a chain-1)
- st(s) – stitch(es)
- sl st – slip stitch
- rep – repeat
Gauge
14 sts and 16 rows = 4 inches in linen stitch. To check, work a small swatch in linen stitch and measure a 4-inch section in the middle; adjust your hook size if your stitch count is off.
Tips Before You Start
- Keep your tension even and slightly firm. A dense, tight fabric is what makes the mat work, so the treats do not slip through.
- Change colors at the end of the last row of each band, leaving a 4-inch tail to weave in later.
- Count your stitches at the end of every band. You should always have 36 sc and 35 ch-1 spaces.
- Cotton yarn has little stretch, so do not pull the base chain too tight or the mat will narrow at the bottom edge.
Step-by-Step Instructions
Mat Body
Base chain: With Color A, ch 71.
Row 1: Sc in 2nd ch from hook, [ch 1, sk 1, sc in next ch] across, turn. (36 sc, 35 ch-1 sps)
Rows 2-4: Ch 1, sc in first sc, [ch 1, sk ch-1 sp, sc in next sc] across, turn. (36 sc, 35 ch-1 sps)
Rows 5-8: Change to Color B. Rep Row 2. (36 sc, 35 ch-1 sps)
Rows 9-12: Change to Color C. Rep Row 2. (36 sc, 35 ch-1 sps)
Rows 13-16: Change to Color D. Rep Row 2. (36 sc, 35 ch-1 sps)
Rows 17-20: Change to Color A. Rep Row 2. (36 sc, 35 ch-1 sps)
Rows 21-24: Change to Color B. Rep Row 2. (36 sc, 35 ch-1 sps)
Rows 25-28: Change to Color C. Rep Row 2. (36 sc, 35 ch-1 sps)
Rows 29-32: Change to Color D. Rep Row 2. (36 sc, 35 ch-1 sps)
Rows 33-36: Change to Color A. Rep Row 2. (36 sc, 35 ch-1 sps)
Rows 37-40: Change to Color B. Rep Row 2. (36 sc, 35 ch-1 sps)
Rows 41-44: Change to Color C. Rep Row 2. (36 sc, 35 ch-1 sps)
Rows 45-48: Change to Color D. Rep Row 2. (36 sc, 35 ch-1 sps)
Rows 49-52: Change to Color A. Rep Row 2. (36 sc, 35 ch-1 sps)
Rows 53-56: Change to Color B. Rep Row 2. (36 sc, 35 ch-1 sps)
Rows 57-60: Change to Color C. Rep Row 2. (36 sc, 35 ch-1 sps)
Rows 61-64: Change to Color D. Rep Row 2. Do not fasten off. (36 sc, 35 ch-1 sps)
Edging
Edging: Change to Color A. Ch 1, sc evenly around entire perimeter, working 1 sc in each st and 1 sc in each row-end, and 3 sc in each corner. Join with sl st to first sc. Fasten off.
Assembly and Finishing
There is no seaming to do, since the mat is worked as one flat piece. Weave in all ends on the wrong side, threading each tail through a few stitches in its own color band so it blends in. Block the mat lightly by misting it with water and patting it flat into a rectangle, then let it dry completely before giving it to your dog.
Pro Tips and Variations
- Swap the pastel colors for bolder shades, or work every band in a single color for a quick, simple mat.
- Make a smaller version for a puppy or cat by chaining fewer stitches and working fewer rows, keeping the same 4-row color bands.
- For extra treat-hiding texture, add a few short fringe pieces or loose loops along the center of the mat after the edging is complete.