Ripple Hem Raglan Sweater: Free Knit Pattern
Introduction
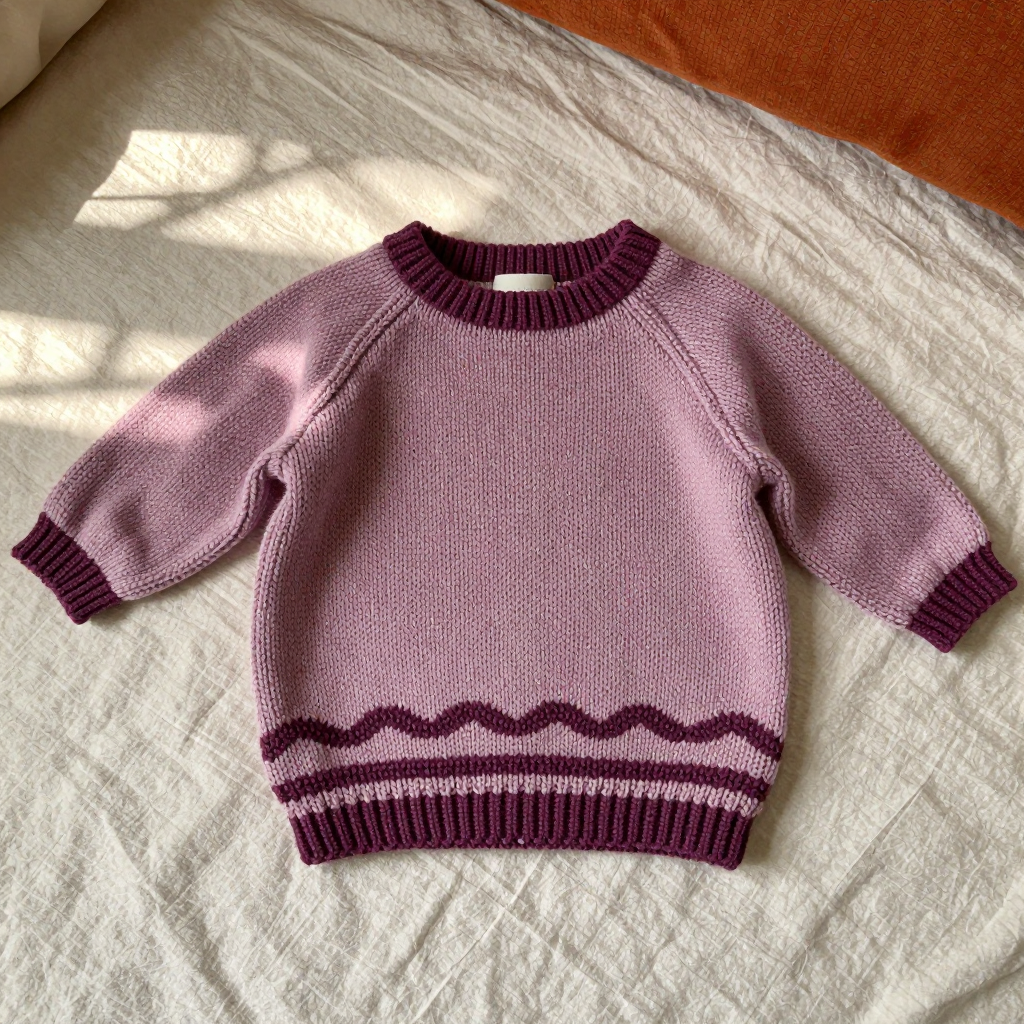
This little pullover is the perfect first sweater project for anyone who has mastered knitting and purling and wants to try something a bit more shaped. Worked entirely in the round from the neck down, it skips all seaming and lets you try on the raglan yoke as you go. The body is a simple tube of soft mauve stockinette, and near the hem a band of plum knit-and-purl stripes creates a gentle wavy ripple that looks far more complicated than it is. It is sized for a newborn (0–3 months), so it knits up quickly and feels light, stretchy, and soft against delicate skin.
Materials Needed
- Yarn: DK weight baby-soft acrylic (approx. 200 yds / 100 g per skein). 1 skein mauve (MC) and 1 skein plum (CC).
- Needles: 4.0 mm (US 6) circular needle, 40 cm, for the neck; 4.0 mm (US 6) circular needle, 60 cm, for the body; set of 4 double-pointed needles, 4.0 mm (US 6), for the sleeves.
- Notions: stitch markers (at least 6), stitch holders or scrap yarn, tapestry needle, tape measure.
- Finished size: To fit newborn (0–3 months). Chest circumference 46 cm, body length 24 cm, sleeve length 14 cm.
Abbreviations
- CO – cast on: make the starting stitches.
- k – knit stitch.
- p – purl stitch.
- rnd(s) – round(s): one full circle of knitting in the round.
- sts – stitches.
- pm – place marker.
- M1R – make one right-leaning increase: lift the bar between stitches from back to front and knit it through the front loop.
- M1L – make one left-leaning increase: lift the bar between stitches from front to back and knit it through the back loop.
- BO – bind off.
- MC – main color (mauve).
- CC – contrast color (plum).
Gauge
22 sts and 30 rows = 10 cm in stockinette stitch. Knit a small swatch in the round (or flat and measure the middle), then check that 22 stitches measure 10 cm across before you begin.
Tips Before You Start
- Use a locking stitch marker or a short length of scrap yarn to mark the beginning of the round so your raglan increases stay lined up.
- The raglan increases are worked on every other round only; the plain knit round in between keeps the yoke from growing too fast.
- When you slip sleeve stitches to a holder, count them to confirm you have 32 on each sleeve before moving on.
- Keep your bind-off loose on the neck, hem, and cuffs so the openings stretch easily over a baby’s head and hands.
Step-by-Step Instructions
Neck Ribbing
With MC and the 40 cm circular needle, CO 60 sts. Join in the round, being careful not to twist, and pm for the beginning of the round.
Rnds 1–4: [k1, p1] rep to end (60 sts).
Raglan Setup
Change to the 60 cm circular needle.
Rnd 5: k9 (left back), pm, k1 (raglan), pm, k8 (left sleeve), pm, k1 (raglan), pm, k18 (front), pm, k1 (raglan), pm, k8 (right sleeve), pm, k1 (raglan), pm, k9 (right back) (60 sts).
Raglan Increases
Rnd 6 (inc): [k to 1 st before raglan marker, M1R, k1, M1L] rep for each of the 4 raglans, k to end (68 sts).
Rnd 7: knit (68 sts).
Rnds 8–45: rep Rnds 6–7 a total of 19 more times (148 sts). You will now have 37 sts for the back, 32 sts for each sleeve, and 46 sts for the front.
Body
Next rnd: k37 (back), slip the next 32 sleeve sts to a holder, CO 4 sts underarm, k46 (front), slip the next 32 sleeve sts to a holder, CO 4 sts underarm, k37 (back) (128 sts).
Work in stockinette (knit every round) for 10 cm, ending after a knit rnd.
Ripple Hem
Change to CC.
Rnd 1: purl (128 sts).
Rnd 2: knit (128 sts).
Rnd 3: [k1, p1] rep to end (128 sts).
Rnd 4: knit (128 sts).
Rnd 5: purl (128 sts).
Change to MC.
Rnd 6: knit (128 sts).
Rnd 7: [k1, p1] rep to end (128 sts).
Rnd 8: knit (128 sts).
Rnd 9: purl (128 sts).
Rnd 10: knit (128 sts).
BO loosely.
Sleeves (make 2)
With CC and the double-pointed needles, pick up and knit 4 sts at the underarm, then knit the 32 held sleeve sts (36 sts). Join in the round and pm at the underarm.
Work in stockinette (knit every round) for 10 cm.
Change to MC.
Rnds 1–4: [k1, p1] rep to end (36 sts).
BO loosely. Rep for the second sleeve.
Assembly and Finishing
There is no seaming to do — the sweater is knitted in one piece from the neck down, and the sleeves are joined at the underarms as you work. Weave in all ends on the wrong side, taking care to secure the color changes at the hem and cuffs. Block lightly by misting with water and patting into shape, then lay flat to dry; this evens out the ripple band and relaxes the ribbing. Do not stretch the neck opening while blocking.
Pro Tips and Variations
- Swap the plum contrast for a soft sage or butter yellow to change the look while keeping the same wavy hem effect.
- For a slightly longer body, add a few extra stockinette rounds before the ripple hem — just remember to buy a little extra yarn.
- Work the sleeve cuffs in CC instead of MC for a bolder color-blocked finish that echoes the hem stripe.