Patchwork Grid Rib Crop: Free Knit Pattern
Introduction
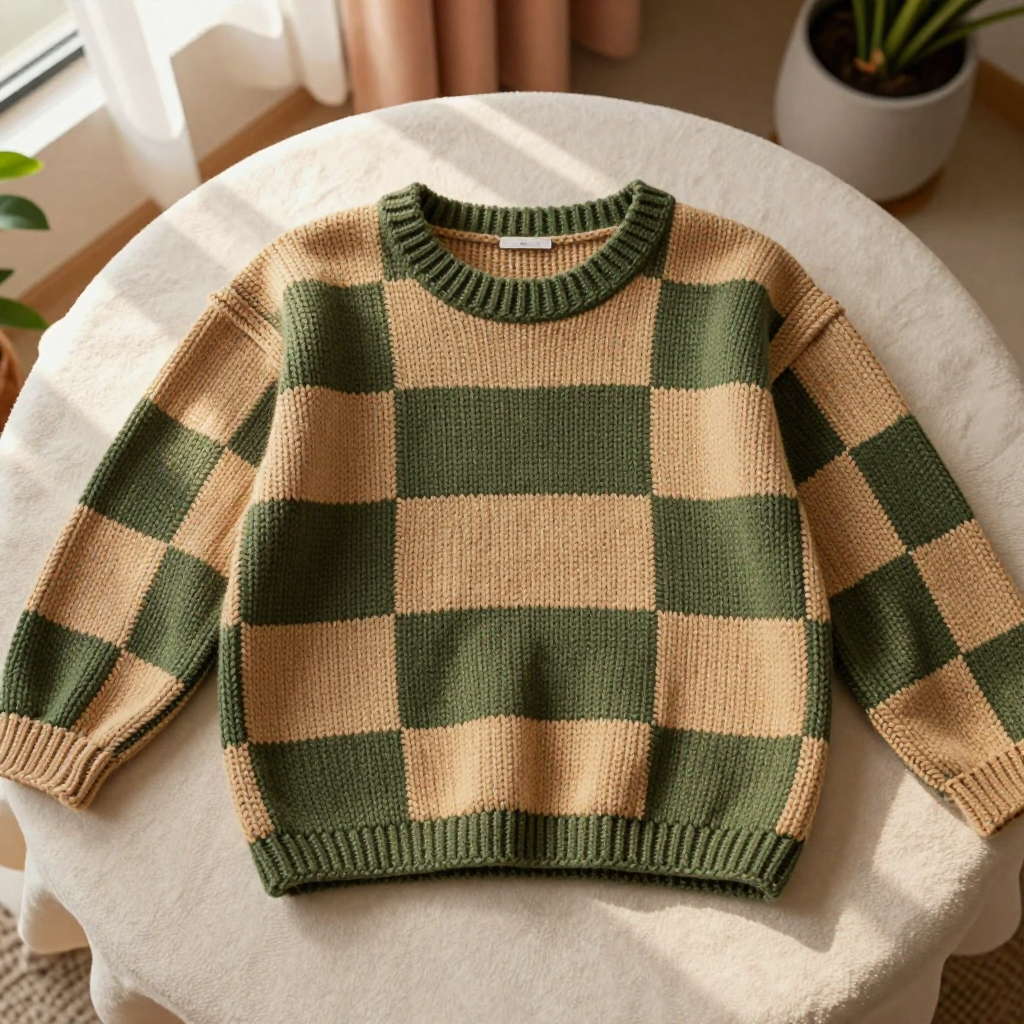
The Patchwork Grid Rib Crop is a boxy, cropped top built from twelve identical 2x2 ribbed squares — six in olive and six in ochre — joined in a checkerboard grid for an easy, streetwear-inspired look. It's a wonderful project for knitters who are comfortable with knit and purl stitches and want to try colorblocking and simple seaming without any complicated shaping. The all-over ribbing gives the fabric a soft, springy hand and a subtle vertical texture, while the straight armholes and cropped length keep the silhouette clean and modern. Wear it over a tee or on its own — it looks just as good with wide-leg trousers as it does with your favorite jeans.
Materials Needed
- Yarn: DK weight (approx. 200–220 yds per 100 g), 100% merino. Color A (olive): 400 yds; Color B (ochre): 400 yds.
- Needles: 4.0 mm (US 6) knitting needles (straight or circular, whichever you prefer for working flat).
- Notions: Tapestry needle for seaming and weaving in ends, stitch markers (optional), tape measure, scissors, blocking mats and pins.
- Finished size: Chest circumference 40 inches (boxy fit); length 18 inches from shoulder to hem; sleeve opening 8 inches circumference.
Abbreviations
- CO — cast on: create the starting stitches on your needle.
- K — knit stitch.
- P — purl stitch.
- St(s) — stitch(es).
- Rep — repeat: work the instruction again as many times as stated.
- BO — bind off: finish the edge so the stitches don't unravel.
- RS — right side: the outward-facing side of the fabric.
Gauge
24 sts and 26 rows = 4 inches in 2x2 ribbing, slightly stretched. To check it, knit a small ribbed swatch, give it a gentle stretch to match the fabric's natural spring, and count your stitches and rows over 4 inches before you begin.
Tips Before You Start
- Make all twelve squares first. Knitting them in batches keeps your tension consistent and lets you lay them out to plan your checkerboard before seaming.
- Keep your cast-on and bind-off edges relaxed. A tight edge makes seaming difficult and can pucker the grid; bind off in rib pattern and keep the tension loose.
- Measure each square as you finish it. Squares should measure 8 inches; if yours come out larger or smaller, adjust your needle size so the finished grid reaches 40 inches around.
- Pin your layout before sewing. Arrange the 3x4 grid on a flat surface and check the color alternation before you pick up a needle — it's much easier to rearrange now than after seaming.
Step-by-Step Instructions
Ribbed Square (make 12: 6 in Color A, 6 in Color B)
Row 1 (RS): *K2, P2; rep from * to end (48 sts).
Row 2: *P2, K2; rep from * to end (48 sts).
Rows 3–52: Rep Rows 1–2 until piece measures 8 inches, ending with Row 2 (48 sts).
Final row: BO in rib.
Assembly
Arrange the 12 squares in a 3x4 grid (3 squares wide, 4 squares tall), alternating colors in a checkerboard arrangement. Sew the squares together using mattress stitch, leaving the top edge open for the neck and the sides open for the armholes.
Neckline
With RS facing and using Color A, pick up and knit 80 sts evenly around the neck opening.
Rnds 1–6: Work in 2x2 ribbing ([K2, P2] around) for 1 inch (80 sts).
Final rnd: BO in rib.
Armhole Edging (make 2)
With RS facing and using Color B, pick up and knit 60 sts evenly around each armhole.
Rnds 1–3: Work in 2x2 ribbing ([K2, P2] around) for 0.5 inch (60 sts).
Final rnd: BO in rib. Repeat for the second armhole.
Assembly and Finishing
If you haven't already, seam the twelve squares with mattress stitch in your chosen checkerboard layout, joining all vertical and horizontal seams except the neck opening at the top and the armhole openings at the sides. Work the neckline and both armhole edgings as described above. Weave in all ends on the wrong side, taking care not to pull them tight. Block lightly to measurements: mist the top, pat it into shape to 40 inches chest circumference and 18 inches length, and let it dry flat. Avoid heavy stretching so the ribbing keeps its spring.
Pro Tips and Variations
- Change the palette: Swap olive and ochre for any two contrasting DK colors, or use a single color for a tonal, textured look.
- Adjust the fit: For a longer top, add a fifth row of squares; for a narrower chest, work a 3x3 grid and add ribbed side panels.
- Play with layout: Try a striped arrangement (alternating rows of color) or a random patchwork for a more eclectic, one-of-a-kind finish.