Sage Ladder Crochet Fingerless Mitts Free Pattern
Introduction
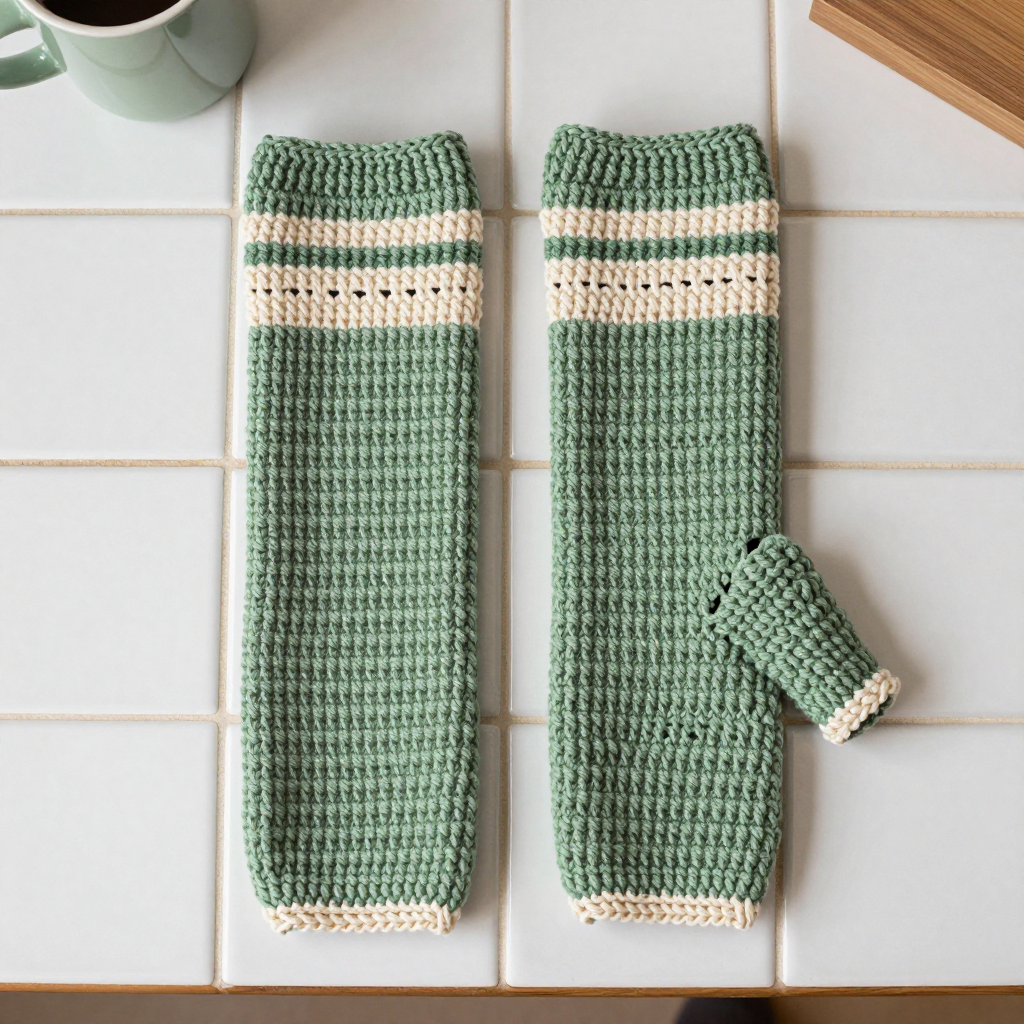
These Sage Ladder Crochet Fingerless Mitts are the perfect first project for anyone who has just learned to crochet in the round. Each mitt is simply a straight tube with no shaping, so you never have to worry about increasing or decreasing — just stitch, join, and repeat. The design pairs a soft sage green background with a single cream "ladder" stripe near the top, where skipped stitches and chain spaces create a narrow openwork band that looks far more complicated than it is. The finished mitts have a relaxed, deconstructed grunge feel: plain tubes, exposed edges, and a small thumb hole that lets your fingers stay free. They're cozy, quick to make, and stretchy enough to fit most hands comfortably.
Materials Needed
- Yarn: (3) Light/DK weight, acrylic or cotton blend. Sage green (MC): 120 yards. Cream (CC): 30 yards. This is enough for both mitts.
- Hook: 4.5 mm (US 7) crochet hook
- Notions: Stitch marker, tapestry needle, scissors, measuring tape
- Finished size: 7 inches long x 3.5 inches wide (flat), stretching to fit a hand circumference up to 8 inches
Abbreviations
- ch — chain: yarn over and pull through the loop on your hook.
- sl st — slip stitch: insert hook, yarn over, pull through both the stitch and the loop on your hook.
- sc — single crochet: insert hook, yarn over, pull up a loop, yarn over, pull through both loops.
- hdc — half double crochet: yarn over, insert hook, yarn over, pull up a loop, yarn over, pull through all three loops.
- st(s) — stitch(es)
- sp(s) — space(s)
- MC — main color (sage green)
- CC — contrast color (cream)
Gauge
7 hdc x 6 rows = 2 inches. To check, work a small flat swatch of hdc and measure a 2-inch section in both directions; if you have more stitches than 7, go up a hook size, and if you have fewer, go down.
Tips Before You Start
- Don't twist the ring. When you join your starting chain into a ring, lay it flat on the table first and make sure all the chains face the same way before you slip stitch closed.
- Mark your joins. Place a stitch marker in the first stitch of each round so you always know where to join and where the next round begins.
- Change color on the last stitch. To switch from MC to CC at the end of Round 5, pull the new color through on the final yarn-over of the last hdc, then join with the new color.
- Keep the ladder loose. Work the chain-1 spaces in Round 7 with a relaxed tension so the openwork band stays visible and doesn't pull closed.
Step-by-Step Instructions
Mitt (make 2)
With MC, ch 26. Join with sl st to first ch to form a ring, being careful not to twist.
Rnd 1: Ch 1, hdc in each ch around. Join with sl st to first hdc. (26 hdc)
Rnds 2-4: Ch 1, hdc in each st around. Join. (26 hdc)
Rnd 5: Ch 1, hdc in each st around. Join. Change to CC. (26 hdc)
Rnd 6: Ch 1, sc in each st around. Join. (26 sc)
Rnd 7: Ch 1, [sc in next st, ch 1, skip next st] around. Join. (13 sc, 13 ch-1 sps)
Rnd 8: Ch 1, [sc in next sc, sc in next ch-1 sp] around. Join. Change to MC. (26 sc)
Rnds 9-12: Ch 1, hdc in each st around. Join. (26 hdc)
Thumb Opening
Rnd 13: Ch 1, hdc in next 13 sts, ch 5, skip next 5 sts, hdc in last 8 sts. Join. (21 hdc, 1 ch-5 sp)
Rnd 14: Ch 1, hdc in each hdc and in each ch of ch-5 sp around. Join. (26 hdc)
Rnds 15-18: Ch 1, hdc in each st around. Join. (26 hdc)
Fasten off. Weave in ends.
Edging (optional)
Join CC at thumb opening. Sc evenly around opening. Fasten off.
Repeat all steps for the second mitt.
Assembly and Finishing
These mitts need no seaming — each one is worked as a continuous tube, so assembly is simply a matter of finishing. Weave in all yarn ends on the inside of the mitt, working each tail back and forth through a few stitches so it won't work loose with wear. If you worked the optional cream edging, tuck its ends in the same way. Block lightly by misting the mitts with water and smoothing them flat into shape, then let them air dry completely; this relaxes the stitches and evens out the ladder band. Avoid heavy stretching while blocking so the tube keeps its 3.5-inch flat width.
Pro Tips and Variations
- Make it a two-color ladder: Work Rounds 6-8 in a second contrast color, or alternate cream and a soft mustard for a bolder stripe.
- Add a thumb ribbing: Instead of a plain sc edging, work a round of sc, then one round of sc in the back loop only around the thumb opening for a slightly firmer, more finished edge.
- Adjust the length: Add or remove plain hdc rounds before the thumb opening (in multiples that keep 26 sts per round) to make shorter wrist warmers or longer arm warmers.